
Cybersecurity Awareness - Information Protection
- Hanna Korotka
- Aug 31, 2023
- 3 min read

Securing Your Data with Microsoft Purview Information Protection
In our fast-paced digital realm, where collaboration and data sharing are the lifeblood of modern enterprises, safeguarding sensitive information is paramount. With remote work and global connectivity on the rise, the need for robust data security and compliance measures has never been greater. In this dynamic landscape, Microsoft Purview Information Protection emerges as your stalwart defender, ensuring your data remains secure and your organization's integrity intact. Let's delve into the world of Purview Information Protection and discover how it empowers you to protect your digital assets in an ever-evolving digital ecosystem.
Understanding Sensitivity Labels
Imagine a sensitivity label as a virtual stamp, applied to your content to signify its importance and confidentiality level. These labels are incredibly versatile, allowing you to customize them according to your organization's unique needs. For instance, you can create categories like 'Personal,' 'Public,' 'General,' 'Confidential,' and 'Highly Confidential' to distinguish between different levels of sensitivity within your organization.
What makes sensitivity labels even more powerful is that they are stored in clear text within file and email metadata. This means that third-party applications and services can read them and take appropriate protective actions if necessary. Furthermore, these labels persist with the content, regardless of where it's saved or stored, forming the foundation for applying and enforcing the policies you configure.
The following example from Microsoft Word shows how end-users might see an applied sensitivity label from the Sensitivity Bar that's available with the latest versions of Office. If a label has been assigned, it is displayed here. Clicking the sensitivity bar or the filename allows end-users to change the label as needed. The labels are also available from the Sensitivity button on the Home tab from the ribbon.

Each item supporting sensitivity labels can have a single label applied to it, and documents and emails can even have both sensitivity and retention labels applied simultaneously.
What sensitivity labels can do?
Once a sensitivity label is applied, any protection settings configured for that label are enforced. These settings include:
Encryption
Emails, meeting invites, and documents can be encrypted to prevent unauthorized access. You can specify which users or groups have permissions for various actions, such as viewing or modifying.
Markings
Sensitivity labels allow you to add watermarks, headers, or footers to emails, meeting invites, or documents, making it clear that they contain sensitive information. Example header and watermark:

Protect Content in Containers
You can protect content in containers like Microsoft Teams, Microsoft 365 groups, and SharePoint sites. This includes controlling privacy settings, external access, and access from unmanaged devices.
Automated Labeling
Sensitivity labels can be applied automatically based on specified criteria, or users can be prompted to apply recommended labels. This flexibility ensures consistent labeling throughout your organization. If you recommend a label, you can customize the prompt, following example shows the automatically generated text:

Default Sharing Settings
Set the default sharing link type for SharePoint sites and individual documents to prevent over-sharing and maintain security.
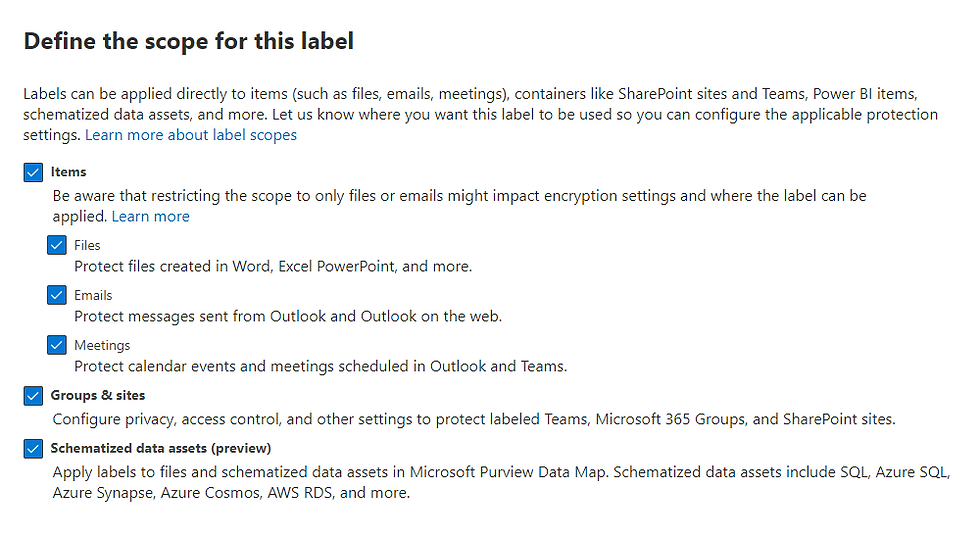
Understanding Label Scopes
When creating a sensitivity label, admin can configure its scope, determining which label settings end-users can apply and where it's available within apps and services.
Label Policies
After creating sensitivity labels, they should be published to make them available to end-users and services. Label policies allow to:
1. Choose which users and groups see the labels. Labels can be published to specific users or groups in Azure AD.
2. Set Default Labels: Specify default labels for unlabeled documents, emails, meeting invites, and Power BI content. Users can change these defaults as needed.
3. Require a Justification for Changing a Label. If a user tries to remove a label or replace it with a label that has a lower-order number, by default the user must provide a justification to perform this action. For example, a user opens a document labeled Confidential and replaces that label with one named Public.

Administrators can read the justification reason along with the label change in Activity explorer.
4. Mandatory Labeling: Make it mandatory for users to apply labels to documents, emails, or meeting invites, ensuring consistent data classification.

5. Provide help link to a custom help page. If your end-users aren't sure what your sensitivity labels mean or how they should be used, you can provide a Learn More URL that appears after the list of available sensitivity labels in the Office apps.
In conclusion, Microsoft Purview Information Protection offers a powerful and flexible solution for safeguarding your organization's sensitive data. By understanding and effectively using sensitivity labels, you can ensure that your data is handled securely while still allowing your team to collaborate seamlessly. So, take control of your data, protect your organization's integrity, and embrace the future of secure collaboration with Microsoft Purview Information Protection.
To help you to have peace of mind knowing your business is secure, click here to schedule a Microsoft 365 Secure Score review with our experts today. We'll evaluate your current cybersecurity measures, identify potential vulnerabilities, and help you implement a strategic security plan to keep your company safe.


Comments